
Simple hobby drones are capable of helping so many industries with mapping technology that can be used by almost anyone, even new hobby drone pilots. But what exactly is drone mapping?
Drone mapping, (known photogrammetry,) is the process of creating 3D models and maps of buildings or landscapes using drones. The drone creates a 3d model or map by taking pictures from multiple angles that overlap each other. These overlapped images give the drone mapping software the ability to measure depth and height. The result is either a 3d model or a map.
But who actually uses this technology? And can anyone do it? You’ll be surprised with the answer, so make sure you keep reading!
What Is Drone Mapping Used For?
Farming
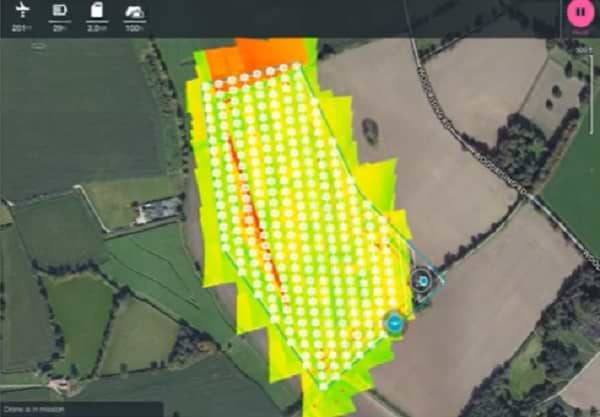
Farmers need to constantly inspect large areas frequently to keep an eye on crop health. With the use of drone mapping, they’re able to compare and keep track of crop health, and crop cycles. This gives farmers more data to work with which and according to this article, drones have helped farmers cut plating costs by up to 85%, which is huge!
Back in the day farmers used to rely on airplanes and or satellite images, which wasn’t really available for smaller farmers. Today, anyone can afford a drone that can do the job just as effectively.
Construction
Drones give managers a better situational awareness of how the land is being used, their progress, and they could even get information that will determine their health and safety risk.
Inspections
Inspecting usually requires a person to get themselves into dangerous situations. Such as climbing a tall tower that extends over 400 feet, or even a tiny pipe the goes just as deep. Not only is this dangerous, but it’s also time-consuming and expensive. It takes a long time to climb that tall tower!
A quicker and safer solution? Drones inspectors can now use drones to map the inspection point quickly. This won’t replace the job completely, because oftentimes you’ll still need hands-on to do the inspection properly.
Another benefit is because inspections can be done so much quicker, this eliminates downtime, which also saves the facility money.
Real Estate
Real estate agents use drones to get better updated footage of the “for sale” property and the neighborhood it’s positioned in. Google maps does often provide enough data for this, however often times google maps will be outdated especially if the home or building was just recently built.
Surveying
Before drones came to the scene, surveyors used to rely on larger airplanes which can be quite expensive, and it takes time to plan a flight path. On top of that airplanes are a lot more limited in terms of where they can. In some cases, special permission would be required to survey some areas.
Drones work well to eliminate all of those pain points. They can get into the air immediately, they are very easily positioned, and it doesn’t take much planning. This means the surveyors can get started with the job a lot quicker.
Surveyors are successfully using drones for:
- Monitoring slopes to prevent landslides.
- Measure accurate volume metric in mines.
- Land surveying for large developments such as roads. This can be done almost instantly which speeds up the project.
- Urban planning.
Forestry
Forestry companies rely on complex growth cycles that need to be managed across thousands of acres. Drones gives managers the ability to inspect a lot quicker, which gives them data to make more efficient decisions.
The 4 Best Drones For Mapping
Most drones that are semi-advanced and that connect to an app on your phone such as your hobby DJI drones can be used for mapping. You really don’t need anything special. That being said, the quality of your drone will determine how well your 3d model will turn out.
If you’re looking for a drone specifically for mapping, then there are four main factors you need to keep in mind:
- Camera quality will heavily affect how well your maps and 3d models look.
- Flight time is also important because mapping takes time. The longer flight time your drone is capable of, the fewer batteries you’ll need. Which will result in a larger mapped area. So if you’re going to take this seriously, make sure you have a drone with a decent flight time.
- Portability. It’s also important that your drone is portable and easy and quick to setup. The last thing you want to carry around a big and bulky drone.
- Range. Finally, the range is also important especially if you’ll be mapping out a large area. However, if you’re just doing this for “fun,” then you’ll get away with a lower range.
Below I’ll mention “the most effective” drones for mapping, but keep in mind, you’re not limited to these drones. Almost any hobby drone will work. It all depends on the quality of the mapping you’ll need.
| Drone Type: | Camera Quality: | Flight Time: | Is It Portable? | Range: | Price: | Purchase Link: |
| DJI Inspire 2 | SUPERB | 27 min | NO | 4.3 miles | $3,299 | VIEW |
| DJI Phantom 4 Pro | SUPERB | 30 min | SOMEWHAT | 3.1 miles | $1,800 | VIEW |
| DJI Mavic 2 Pro | GREAT | 31 min | VERY | 11 miles | $1,599 | VIEW |
| DJI Mavic Air 2 | GOOD | 34 min | VERY | 6 miles | $799 | VIEW |
The Best Software For Drone Mapping?
Keep in mind while most drones can be used for mapping, you’ll need mapping software to turn your data into 3d models or maps. Here are some of the best mapping software applications you can use.
| Application: | Free Version? | Download Link: | |
| 01. | Drone deploy (My favorite) | YES | VIEW |
| 02. | DJI terra | NO | VIEW |
| 03. | Maps Made Easy | YES | VIEW |
| 04. | Pix4D | YES | VIEW |
How Do You Map With A Drone?
When I first did research on drone mapping I was actually really surprised at how simple this is. I always had it in my mind that you would need special equipment. But as long as you have a decent drone, and a free version of one of the apps above then you’ll be good to go.
In the tutorial below, Billy used Drone Deploy which can be used with most hobby drones.
Things you’ll need:
- Download and install the “Drone deploy” application on your phone. You can use the free version if you’re starting out.
- Any drone with a high-quality camera and great flight time will work.
Steps for setting the app up:
- Once you’ve downloaded and installed the app, click on the menu button at the bottom right. Then tap on “New Project.”
- Set your flight area. In this step, it’s best to make the are bigger than the area you’re trying to map just in case something get’s messed up.
- Change flight altitude. Lower the drone, the higher the resolution. In the video above Billy uses an altitude of 150 feet for all of his maps. If you notice there are any structures in the area that are higher than 150 Feet, then make sure you set your altitude to be above the highest point of the structure.
- Keep structured mode on if you’re mapping structures. However, if you’re mapping landscape then make sure you turn it off.
- Keep the live map turned off.
- Go into the advanced settings, and turn off the automatic settings. For “front overlap,” and “side overlap” set these to 75%.
- Connect your phone to your remote control how you usually would, then run the “drone deploy” app instead of your standard drone app.
- Launch mission and trust your drone! If you plan your mission properly then you shouldn’t have any issues here.