I found an awesome location to fly my drone a few weeks ago but turned out it was within a 5-mile radius of an airport. Here’s how I notified the airport of my drone flight.
You can notify an airport by using the LAANC, (Low-Altitude Authorisation and Notification Capability,) on your mobile device or online. The application is extremely easy and almost-instant which then gives you airspace authorization to fly your drone. You can’t just call anymore.
The old method used to require that you call the airport. However recent laws state that hobbyist drone pilots all need to apply for LAANC authorization.
But what is LAANC and how does it work? Is it difficult to use? Fortunately for us, once you’ve done it once, it’s actually pretty damn easy. So make sure you read further to find out exactly how to do it.
How To Apply For LAANC?
The LAANC system, (which stands for Low-Altitude Authorisation and Notification Capability,) used to only be for commercial drone pilots, but now recreational drone pilots or hobbyists have to use it as well if they want to fly within a 5-mile radius of an airport. Basically anyone who wants to fly in restricted air space needs to use the LAANC.
The LAANC is a partnership between the FAA and private companies such as Airmap, DJI, Skyward and Kittyhawk. It is actually pretty easy to use these applications to request authorization to fly your drone near an airport.
The simple steps to request authorization for all the apps is to:
- Open the app.
- Enter in your flight or mission details.
- Then request access.
As simple as 1,2,3. Here is a more detailed explanation of how to request access using the two most popular apps.
How To Apply For LAANC On Airmap App
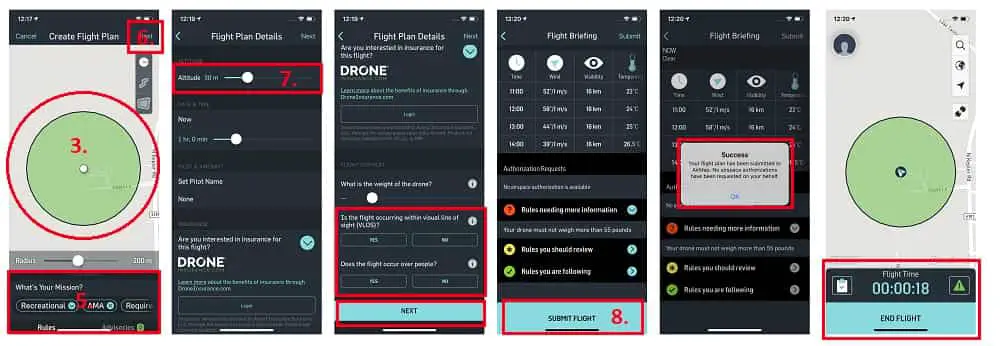
- Simply download the Airmap app. Download for iPhone here, and android here. Open it and create an account by tapping on the circle profile image on the top left. That should only take you a few minutes. Once you are logged in you will see some circular grid areas along with a blue dot, this is you, it is your current location.
- Use your fingers to zoom in and locate the area that you would like to fly in. Continue to zoom in until the numbers representing the maximum ceiling appear. These numbers represent how high you are allowed to fly your drone in that quadrant.
- Tap and hold your finger on the screen until a circle appears. A slider will also appear that allows you to adjust the radius of the circle. If the radius of your circle extends into restricted airspace, the circle will turn red indicating that you need to reduce the radius because you can not fly in that air space. If the circle is orange then you are given the ok to request authorization.
- A menu with different stencils will be in the top right corner of your screen allowing you to draw your own flight path as well as draw your own boundaries.
- Once you have a flight plan all picked out and ready you will move your attention to the bottom of the screen where the app asks “What is your mission?”. You will then choose “FAA Recreational Flyers – 44809” out of the options provided to you.
- When that is done click on next.
- The preflight checklist should pop up. This is where you need to enter as much info about your flight as you can. Things like how long you will be flying for, the maximum altitude you will be flying to, your name and the name of the drone if it has one, the weight of the drone and if you will be flying over people.
- Click on Next and you should get a notice and text message letting you know if you are approved to fly in that area or not.

You won’t get approved if…
- Now just a little advice, if you click yes and say you will be flying over people, you will definitely get a no on your request.
- Another thing that might lead to your request being denied is if you click no to the question “Will you be keeping a visual line of sight?”.
These are basic drone rules that apply to all pilots so if you say that you will be ignoring these rules your request will definitely be denied.
How To Apply For LAANC On Kittyhawk
- First, download the Kittyhawk app on your mobile phone.
- Click on the airspace icon which will then bring up your map. Then you are going to navigate using your fingers to the location you want to fly in and click on that area.
- At the bottom, you will click on the blue identifier and it will tell you the max altitude you can fly in the rectangle you have selected. If you are happy with this go ahead and click on the “Get Authorization” button.
- When you have done that, options will pop up on the screen. You will choose the recreational option and enter your phone number and if it is your first time it will ask you to verify your number. You will then get a text, enter the verification number that was texted to you and you will be verified.
- Next, you are going to navigate back to the previous page and it will ask you to draw out your flight plan. You will then choose the maximum height you will be flying.
- Next, you will enter all the important details about your flight such as the time you will be flying, how long you will be flying and when you will be flying. When you have done all that then you will proceed to click next.
- This will then take you to the screen that tells you if you are eligible to receive authorization approval. Then just click on next again and you are ready to go.
Both of Kittyhawk and Airmap are exceptional apps and have a variety of different features to improve your drone flying experience. They both do the same job very well just in a few different ways.
There are other apps out there that you may also use to request authorization to fly near an airport but they are not as good as the ones I have mentioned above.
LAANC Did Not Work For Me
Sometimes LAANC does not work 100% of the time for a few reasons.
- Air Traffic. You may not be in an area that allows for instant airspace authorization because there might be more air traffic there at that moment.
- Information. The information you entered regarding the flight you are about to take might have gone against basic drone laws and thus the application for authorization would be turned down immediately. When asked if you will be flying over people and you click yes, of course, they will turn down your application.
If you avoid these things you should be able to ask for authorization. If you are still not able to get near-instant approval with LAANC then you should try to fill out the FAA’s online airspace authorization form.
After you have submitted this form to the FAA, they will strive to review and issue decisions on authorization requests within 90 days of the submission. The time required to process may be different depending on how complex your request is.
What Happens If I Do Not Contact The Airport?
If you decide not to contact the airport through LAANC or you are unable to do so but decide to fly your drone in restricted airspace anyway then this could end very badly for you.
If you would like to get a better idea of what will happen, we dedicated an entire article on this website to discuss the kind of fines you can get for breaking drone laws.
If you fly in a no-fly zone without authorization and are caught you could be fined up to $5,000 and that is if you get off easy. You could face jail time for flying a drone near an airport.
Many fellow enthusiasts have tried to ignore these warnings and fly their drones in restricted air space leading to their drones being confiscated and them spending time in jail.
Flying your drone for 25 minutes is not worth losing it forever and spending time in a jail cell or paying up to $5,000 because of it. Rather stay safe and use the LAANC authorization or do not fly your drone.
