
I was flying my drone the other day when it suddenly stopped moving, and a warning popped up on my screen. I did some research and found out that this was because of ‘geofencing.’
Geofencing is similar to a virtual barrier that drone manufacturers have put in place using GPS data to keep drones from entering restricted air space that they are not supposed to fly in, such as airports and prisons. This feature is there to help pilots stay within class-G airspace and to avoid No-Fly Zones.
Keep reading this article to find out more about geofencing and exactly how to unlock it!
Why Does Geofencing Exist?
Geofencing is a technology that has been around for a long time and is used in different technologies for various purposes. This geofencing technology creates a fence-like barrier around a specific area.
In the same way that a fence is there to protect and block your dog from leaving the yard and potentially being hit by cars, geofencing works in the same way for drones. The drone will actually hit an invisible wall and be forced to turn around and be unable to enter the restricted zone.
This technology keeps drones from taking off in areas that are restricted by the FAA. These areas are usually around airports, sporting events, and government buildings which will be labeled temporary No-Fly Zones.
Companies like DJI have this technology in all their drones. Since DJI is the leading retailer of consumer drones, this means a lot of pilots have been restricted by this technology.
All of their drones are equipped with this technology and are not even able to take off when in a restricted area. Pilots should not view this as a bad thing, because it also helps protect the people around them.
If geofencing did not exist, there would be nothing stopping drones from flying into restricted airspace and colliding with airplanes.
The geofencing tech is applied to the applications that support the LAANC ( Low Altitude Authorization and Notification Capability) program, applications like the DJI GO app, KittyHawk, and a few more apps.
The geofencing system on the DJI drones is constantly being updated and refined in order to continue to work perfectly.
Yuneec drones and Parrot also offer geofencing tech within their apps which enforces the existing no-fly zone restrictions.
But this does not mean that you can’t fly your drone in these zones at all. Using the LAANC program you can request to fly in a No-Fly Zone. These zones are categorized in different colors to identify their different levels.
Keep reading to find out more about these zones and exactly what each zone means!
Geofencing Zones Explained
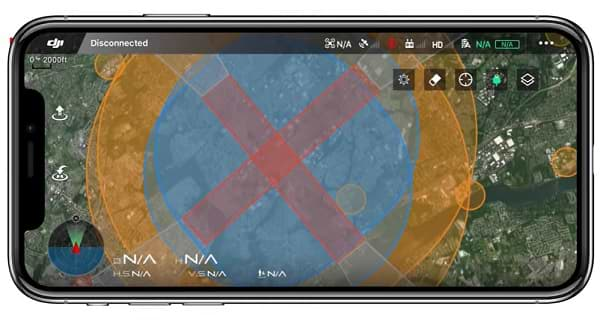
There are different color coding zones that indicate the different kinds of geofencing zones. These color codes are:
Red Zone
This color indicates the restricted zones which will require a custom unlock.
Grey Zone
The Grey Zone indicates any area with flight restrictions. The places with flight restrictions are usually areas near airports.
The restrictions in this zone cannot be unlocked because of various safety reasons.
Blue Zone
This zone color indicates an area that is risky to fly in but can be unlocked using a self-unlocking system.
Yellow Zone
Yellow zones do not require any unlocking, all they do is indicate that the area you are in might be a little dangerous to fly in.
The only thing that will happen is a notification will show up on the pilot’s display warning them.
How To Apply To Unlock Drone Geofencing?
DJI was the first company to introduce geofencing in their drones, and since they are the leading producer and supplier of drones in the world, this means most drones around the world have this technology implemented.
I will be focusing more on the DJI drones when explaining the unlocking method, as they are the most owned by many drone enthusiasts around the world, and because of that, many hobbyists are not able to fly in certain areas.
There are two types of unlocking that you can do in order to unlock the geofencing on your drone. There is the Self Unlock that can be done with blue zones and a Custom Unlock which can be done on red zones.
Before you start with the unlocking process you need to make sure that you have the authorization to be able to fly in the area that you are requesting to unlock.
You need to first get authorization to fly in this area because this authorization needs to be presented in your unlocking application.
Self Unlocking
Here are the steps to follow in order to self unlock your drone geofencing:
- Before you do anything else, you need to login to your account on the DJI self unlock webpage.
- Select your drone model.
- Find the location you want to fly in and select it.
- You select it by pressing the blue pin(representing self unlock zones) that covers the area you want to fly in.
- Enter your flight controller serial number.
- You need to enter your cell phone number or the credit card number, that is associated with the drone you are flying, to verify your identity. If you enter a cellphone number, it is essential to keep it close to you because you will be required to enter a verification number that will be sent to you in an SMS.
- Now that you have finished the steps listed above, choose the date you want to fly and then click the “Submit” button.
- The unlock will start at midnight on the day of the drone flight.
Custom Unlocking
Here are the steps to follow in order to custom unlock your drone geofencing:
- Log into your DJI account on the custom unlock page.
- Choose your drone model.
- Identify the specific location that you want to fly in.
- Select the red pin of the area, and you need to remember that red means it is a custom unlock zone.
- You need to present then the proof that you are authorized to fly your drone in that area. Usually, this will be a LAANC authorization, but sometimes people have some sort of other documentation that they choose to present instead.
- When you have finally completed the above steps, you need to agree to all the terms and conditions and then click “Submit.”
- Now it is time for the waiting period. DJI needs to review your request and reply to it. This usually happens an hour after you have clicked the submit button. If your application has been approved, you will receive a confirmation email stating this.
- If you have any problems with the above steps, contact DJI support for assistance and to check on the status of the request you have made.
How Do Enthusiasts Feel?
Well, the droning community is really split in two when it comes to the topic of geofencing, and they are either happy about it or completely hate the tech!
“Don’t tell me where to fly!“
–Common enthusiast phrase.
A lot of enthusiasts in drone forums online have expressed their dislike of the technology saying that it restricts them from flying where they want to fly. They feel like since they put down a decent amount of money buying the drone, they should now be able to fly wherever they want to.
A lot of enthusiasts have faced the problem of driving all the way to a location they have wanted to fly their drone for a long time. Upon arrival, all they see on their screen is a big error message telling them they cannot fly in that area.
But, this tech was not put in place just to inconvenience drone pilots! It actually helps keep the people around enthusiasts safe as well as keep the pilot safe.
How does it keep pilots safe?
Well, it is illegal to fly in a restricted or No-Fly Zone. So having geofencing stop you from entering one of these restricted areas will keep you from getting in trouble with authorities.
If you are found to be flying in a No-Fly Zone, you can collect a hefty fine and even be arrested if you are found carelessly flying your drone either on purpose or by mistake.