
You just set your drone down to get ready for a quick flight. When you take off, you realize that your drone starts to drift automatically! Chances are it’s because your drone needs to be trimmed. If you’re not sure what this involves, I’ve done my research, and here’s what I found.
Drone trim involves adjusting the drones roll, pitch, yaw, and throttle by using the remote controller until the drone’s aerodynamics are perfectly balanced. A well-trimmed drone will allow it to hover in one place without any input from the controller.
Keep reading the article to find out more about drone trim and exactly how to do it properly!
Why Do Drones Have Trimming?
Each control on the controller has its own dedicated trim button. When you push forward on the throttle to try to get your drone off the ground, you might notice that the drone drifts a little to the left or right.
Or maybe it isn’t tilting in one direction, but it keeps leaning to the left and right and is just not stable!
This tends to happen is the drone is unbalanced. To balance the controller, you need to offset the controller so that it’s ‘resting’ position is perfectly balanced in flight.
Usually, instructions on how to use the trimming buttons will be in the drone’s manual or instructions, so make sure you have a look in your manual before trying the methods laid out below.
Most drones have 4 trimming buttons:
- Forward
- Backward
- Left
- Right
Forward and backward are referred to as the pitch of the drone, and when reding the manual, it might refer to pitch trims.
Left and right is referred to as roll, so when reading a manual on how to trim your drone, that might refer to it as roll trims.
Do All Drones Have Trimming?
Generally speaking, only cheaper toy drones have drone trimming. This is because they don’t have smart flying features, so the process needs to be a lot more manual.
More expensive UAVs (Unmanned Aerial Vehicles) like the ones from DJI and others, use GPS, gyros, and other smart flying features to stay in place, so these drones usually don’t have to trim.
How To Adjust The Trim On Your Drone
Firstly, you should not just trim your drone every time you see it drift slightly in the air. Every drone will drift a little in the air trying to correct itself, as well as the fact that the wind will affect its movement anyway.
But, if the drone is really drifting a lot and you have already calibrated it and the controller, then you can use trim to fix this.
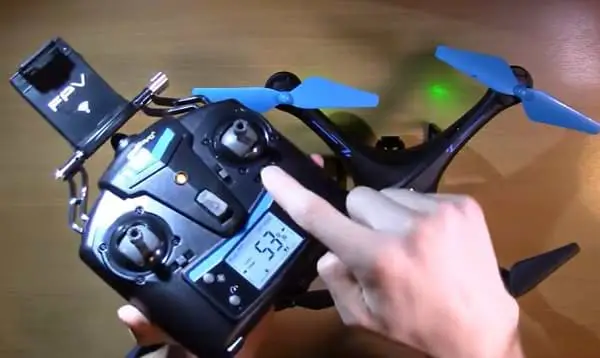
Like I mentioned before, trim buttons are located all around the control pad, and the way to monitor the trim is by looking at the screen on the controller.
The switches or buttons around the controller pad coordinate with the direction you move the drone. If the joystick moves the drone to the right, moving the switch to the right will also move the drone in that direction.
You can’t really calibrate throttle, but you can calibrate yaw, which is when the drone is spinning in the air. This will let you control that, and your drone should have a corresponding trimming switch for yaw.
Your drone controller should have a built-in speaker that beeps every time you adjust and trim your drone. The lower you flip one of the trimming switches, the deeper the beeping should get. And when you press the switch the other way, the beeping will become higher pitched.
You can use this sound in order to help you calibrate and trim your drone. When you reach the middle or “level,” the controller will make a louder beep.
Here is how to trim your drone:
- Hover your drone, and while it is hovering, you need to try to notice which direction it tends to drift to.
- Land the drone, and trim in the opposite direction the drone was drifting towards.
- If your drone is leaning and drifting right, trim the drone to the left.
- You should repeat this process until you get your drone to hover correctly.
How To Calibrate Your Drone
The most common reason for a drone to drift off course and not fly straight or hover in place is that the IMU (Inertial Measurement Unit), which is basically the internal compass of the drone, is not calibrated correctly.
Before you jump into calibrating your drone, here are a few things that you need to be aware of:
- You need to have an open area to calibrate your drone. If a drone is not calibrated, you might not be able to control it.
- Remove any guards and other accessories that might be on the drone before you attempt the calibration. If there are accessories on the drone when calibrating, the drone won’t be adequately calibrated.
- Metal objects can mess with the calibration process, so it is a good idea to do the calibration away from metal objects such as watches and rings.
- When calibrating your drone, make sure to use a flat surface.
When you are calibrating a drone’s IMU and compass, you are in the process of correcting the errors that cause inaccurate sensor measurements during the drone’s flight.
You need to do a calibration now and then because, over time, the sensors may drift in their response due to vibrations, aging, and various other impacts.
If you calibrate, the sensors will remove the errors and avoid malfunctions, restoring your drone to its regular flying ways.
Here are the steps to follow to calibrate your FPV drone:
- Firstly, you need to turn on your drone controller. When you have turned it on it will have a blinking yellow light.
- When you have done that, you can turn on your drone and you should notice the LEDs on the drone turn on and start to blink.
- Make sure you have the drones landing gear on and have placed the drone on a flat surface.
- When you have completed the first 3 steps, you then want to arm the drone normally.
- Push the left stick down then all the way up, then down again.
- Push the right stick down and to the right.
- You will then see the LEDs stop blinking. This means that the drone is finished calibrating.
Headless Mode
Unlike a car, plane, or helicopter, drones are similar-looking from all sides, and thus it is hard to determine which direction is the forward-facing direction.
Some drone manufacturers have come up with a smart way to help enthusiasts know which way their drone is facing by putting different colored LED’s to indicate which direction is forward-facing.
The only problem is, when the drone is a decent distance away from you, you can’t see the LED. This is where headless mode comes in!
Headless mode is basically the ability for a drone to remember the orientation in which it took off. The orientation of your drone in the air doesn’t matter when the drone is in headless mode if you press left on the joystick, the drone will move left.
This means that you can focus more on flying your drone and less on the orientation. This is also useful when calibrating and trimming your drone!
Is there a way for a drone to save, or remember, or whatever you may call it, it’s trim settings. It is not very much fun to have to waste your flight time Everytime itgets powered off to re trim