
So you just got a new drone but you’re not sure how you’re supposed to register it with the FAA? Don’t worry, I’ve got you covered. I went through the registration myself process and recorded the process step-by-step.
Things You Should Know Before Starting The Registration Process:
You need to be 13 years or older. If you’re younger then 13 then you’re going to have to get your parent to register for you.
You only need to register once if you have multiple drones. If you have two or more drones you’ll only need one registration number. So only do this process once. Make sure you mark all your drone with the same registration number. *This only applies to recreational drones. If you have commercial drones you’ll need to register each drone under part 107.
The cost to register a drone with the FAA, (Federal Aviation Administration,) is $5 and you’ll need to pay online.
The registration number you’ll get will only last 3 years. After it expires you’ll need to do this again. That being said, when you mark your drone make sure you do it in a way that can be easily removed later.
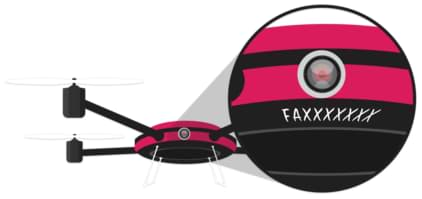
Remember to mark your drone with your registration number after this process. Here’s an infographic that shows the best way to mark your drone.
Make sure you remove any old registration numbers from your drone before marking your drone with your new registration number.
Step 01. Visit The Official FAA Drone Zone Page
The first thing you’ll want to do is visit the FAA drone zone page here. Once you’re there, look for “the exception for recreational flyers,” section. This is what you’ll be registering under as a hobby drone pilot.
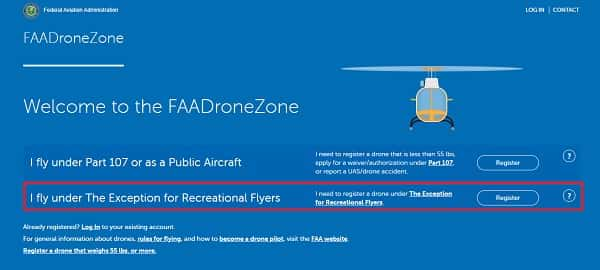
To the right of that text, you’ll see a “Register” button, go ahead and click on that.
A few notes:
- If you are using your drone for commercial purposes—or in English—to make money, then you’ll want to register “under PArt 107 or as a public aircraft.”
- If your drone weighs more than 55 pounds you’ll need to do a paper registration called the “N-number” registration process. You’ll find more details on this at the FAA’s Aircraft Registry page here.
Step 02. Create Account
Once you clicked on the register button you’ll be taken to a “create account” screen. This is where you’ll create your basic account.
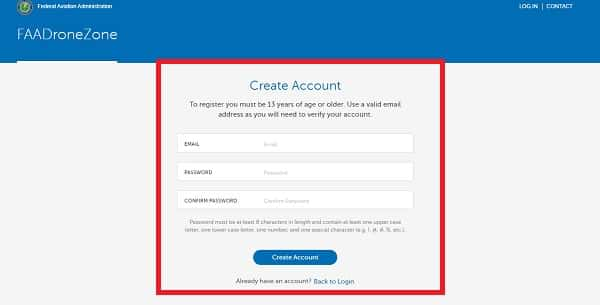
- First, insert a valid email address that you have access to right now.
- Then insert a password that you’ll be able to remember. Make sure your password follows these requirements; “must be at least 8 characters in length and contain at least one upper case letter, one lower case letter, one number, and one special character (e.g. !, @, #, %, etc.)”
- Finally, click on the blue “Create Account,” button on the bottom of the screen.
Step 03. Check Your Email
You’ll be prompted to check your email for an email from the FAA. This email should come through instantly, so if you can’t find it make sure you check your spam or junk mail.
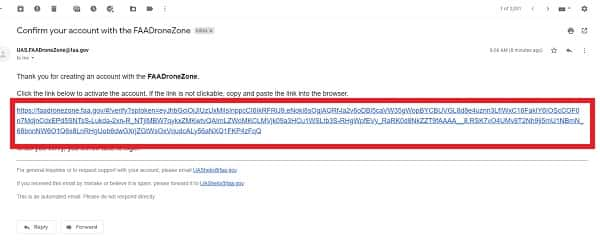
Found the email? Great! Next step is to open it, and click on the loooong link to confirm your account.
You’ll be taken to a new page letting you know that you’ve successfully verified your account. Now you can use the logins that you provided. Click on the “back to login” text.
Read through the “System Use Notice,” then click on “I Agree.”
Login to your account using the same email and password.
Step 04. Complete Profile Form
This is where the bulk of your personal information is provided. These details need to closely match your current details as much as possible. These are the details that will be attached to your drones registration number.
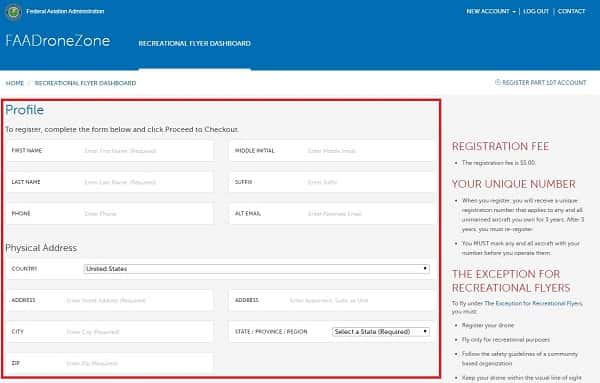
TOP TIP: If your mailing address is the same as your physical address, tap the “mailing address is the same as my physical address” check box, and it’ll automatically use the same info. This will save you a bit of time.
Once done, click on the blue “proceed to checkout” button at the bottom of the screen.”
Once clicked, the website will automaticallyt suggest an address. Select the right one.
Step 05. Acknowledgement of Safety Guidance
You’ll be taken to a page that lays out all the most important FAA flight rules that you need to adhere to.
Here are some of the more important rules:
- You can’t use your drone to make money. This includes selling your images online as stock footage.
- Keep your drone in a line of sight at all times.
- Get out of the way of other aircraft in the area.
- If you want to fly in airspace that is being controlled, for example, if you’re flying a drone within a 5-mile radius of an airport, then you’ll need to ask permission. It’s actually pretty easy so don’t let this scare you, I wrote an article that covers exactly how you can request access to fly in controlled airspace.
- Don’t fly over or at 400 feet above ground level. Anything over you’ll be in controlled airspace.
- Stay out of the way from medical personnel.
- You’ll need to pass an aeronautical knowledge and safety test sometime in the future. As mentioned before this test isn’t available yet to hobby drone pilots. However to stay updated, make sure you bookmark this FAA page and view it every now and then to see if there are updates. Or you can follow any of their social media channels here.
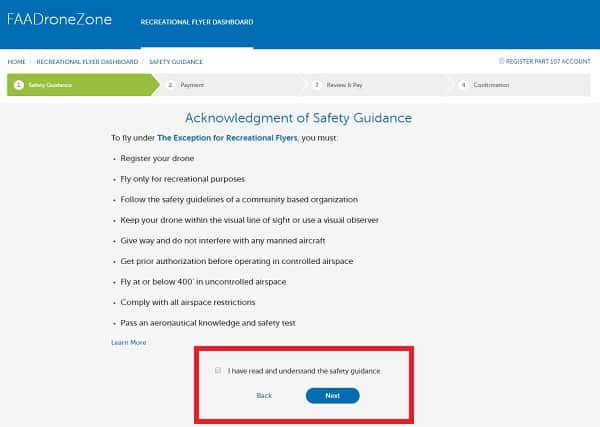
Once you have read and understood all that, you’ll need to check the box, and click on the blue “next” button.
Step 06. Pay Your $5 Registration Fee
Now it’s time to make payment. Before getting started you’ll need a credit card or debit card that is capable of making online payments. As far as I’m aware this is the only way you can make payment to register as a hobby drone pilot.
Also, if you are using someone else’s credit card, make sure you use the right billing address that is attached to your card. If you don’t your payment might get rejected.
You’ll now be taken to a review and pay page. Make sure you read over all the details and make sure they are correct.
Check the box, then click on the blue “Pay” button.
Step 07. Mark Every Drone That You Own With This Registration Number
You’ll now be taken to a screen that gives you your registration number which will also be emailed to your inbox.
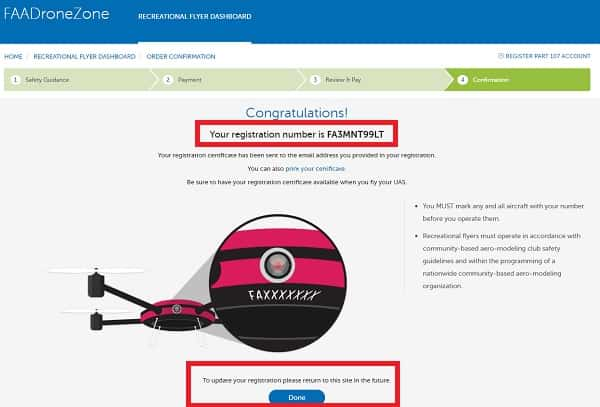
The next step is to mark every drone you own with the “FA” number, it’s extremely important. If you fly a drone without a registration number you can get a hefty fine. So make sure you do it as soon as possible.
*Here’s an infographic that shows the best way to mark your drone.
TOP TIP: This registration number only lasts 3 years, so don’t write it on your drone with a permanent marker. Rather use a sticker of some sort so that you can easily remove it in the future.
And that’s it. Once you’ve gone over all these steps you’ll be able to legally fly your drone within the United States.
Things To Remember After Registration
Drone laws are constantly changing and evolving across the world at a rapid pace, so make sure you join a drone community of some sort to make sure you stay in the loop. Here are some of the more popular online forums based in the U.S that you can use:
More Information On The Aeronautical Knowledge And Safety Test
The newest update that is creating the most talk in the community is the aeronautical knowledge and safety test for hobby drone pilots. To date the test still hasn’t been rolled out, however this may change in the near future. Here are the two channels you can use to stay updated: