
If you’re prone to getting your drone caught out in the rain, then its probably a good idea to give it some protection against the elements.
Here are four of the best waterproofing options for your drone. Each method was designed for people with different experience levels. For example, some people will feel comfortable stripping their drones completely, while others won’t even want to remove the drone’s outer case. So if you’re a bit of a technophobe, don’t worry, we’ve got a method for you too.
| Method: | Skill Level: | |
| 1. | Use DryDrone Shake & Bake. | You are comfortable taking apart your drone completely. |
| 2. | Use Silicone Conformal Coating. | You don’t mind stripping your drone as much as possible. |
| 3. | Use CorrosionX HD. | Only comfortable removing the outer cover of the drone. |
| 4. | Buy your drone a wetsuit. | Don’t feel comfortable opening up your drone at all. |
Now if you’re happy to take your drone apart, you’ll need to know which are the most important electronic components to tackle first. I’m going to assume you have minimal experience with electronics, so I’ll try and explain this in the most simple terms possible. Don’t let this intimidate you, it’s actually quite easy.
If you don’t feel comfortable opening your drone, please skip to method number 4.
Important Electronic Components That You Should Be Protecting First
Before getting started, you’ll need to know what electronic components you should be protected in the first place. I recommend you focus on the parts of the drone that are the most sensitive to sudden voltage changes. Keep in mind that some of the waterproofing methods mentioned below will need you to remove these important electronic components, while other less effective methods don’t need you to take apart your drone at all.
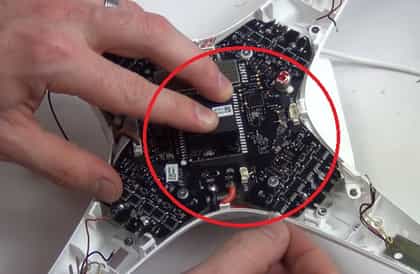
Printed circuit boards.
The electronic components that are at the highest risk can be found in the legs of the IC’s, (Integrated circuit,) on the printed circuit boards. Which are the big green looking boards with a lot of chips on and lines on them. These boards have hundreds of little charges of electricity that can easily be disrupted even by a drop of water. So you want to take out as many printed circuit boards as possible.
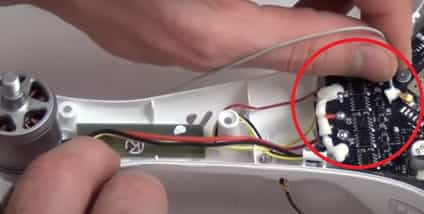
Motor ESC, (electronic speed control,) connections.
If the integrated circuit on these connections short circuit, then it could fry your motor or even your electronic speed control. These are usually situated on the drone’s arm where the wires that come out of the motor attach.
Battery or mini ports.
Now, these areas are weak points on the drone because they are always exposed. This makes it difficult to waterproof. Ports usually include battery ports or any areas where something can be plugged in. A lot of people skip over ports because of this, however, if you would like to make your drone extra waterproof, then make sure you use the methods below that allow it. DO NOT use silicone in ports, it will stop the plugs from working.
Should you take apart your drone?
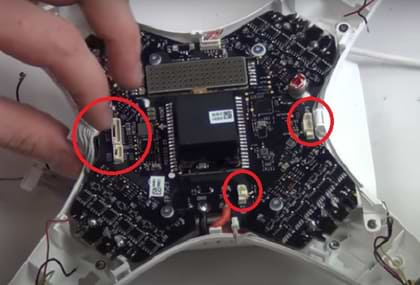
Now that you know what to remove, you’re probably wondering how to remove them. Now, this step will obviously heavily depend on your type of drone or quadcopter. I’ve gone ahead and sourced a video on how to take apart a DJI Phantom to help you along the way. However, I highly recommend you find a tutorial video that walks through how you can take apart your specific drone.
How far you would want to break down your drone is also completely up to your preference and the method you select below. So please go through the entire article before you start removing electronic components.
IMPORTANT: Keep in mind that you might void your warranty when breaking down the drone or using any of the steps below to waterproof your drone.
01. Waterproof Drone With DryDrone Shake ‘n Bake
This stuff is a powder made by some chemicals. The product was designed to overcome some of the limitations that come with conformal coating. This product, unlike formal coating, is not electrically resistant. Which might sound like a bad thing at first, however, hear me out for a minute.
The liquid has water-resistant qualities, however, it still allows electricity to flow. This unique combination allows you to fully coat your entire drone without worrying about stopping the flow of electricity on ports and plugs.
The downside is that is isn’t as effective against liquid short-circuiting any of the electronic components.
Before starting.
- Get some DryDrone Shake ‘n Bake here.
- Don’t leave the bottle open. This stuff evaporates extremely fast.
- You can either paint it on or use the bag method, in this tutorial I’ll be talking through the bag method which works better in my opinion.
- You’ll need to take any electronic components that you want to waterproof out of the drone before you start this process.
- Make sure you still have the Shake ‘n Bake bag. You’re going to be using it to bath your electronic component. Get it here.
- You’ll be able to solder through the thin layer of Shake ‘n Bake if you need to make any future fixes.
- Don’t use this on any internal components of your camera.
- This might void your warranty.
Let’s get started.
- Get your electronic component ready to soak with Shake ‘n Bake.
- Use the eyedropper and fill it up with some DryDrone and squeeze it into the Shake ‘n Bake bag. You can use as many eye dropper amounts as you think is necessary to cover your electronic component. Keep in mind that you can still pour it back in the bottle, so you’re not wasting anything.
- Remember to close the bottle.
- Place your electronic component into the bag and close it. Squeeze as much air out of the bag as possible.
- Then shake it making sure you get the liquid on all areas of the component.
- Take it out of the bag with the paper clip provided.
- Do the next component.
- You could also brush this stuff on any electronic components that you don’t want to remove out of the drone.
- The last step is to brush over any electronic ports.
INSIDER TIPS: If you know your drone will be getting soaking wet, you could paint on some conformal coating on the more important component after you’ve gone through the Shake ‘n Bake steps.
02. Waterproof Drone With Silicone Conformal Coating
This is designed to completely waterproof your drone, however, the downside to this product is that because it’s so effective at separating electricity that runs through the components from the elements, that there is a high risk of coating the wrong areas, such as plugs, which could cause them to stop working.
A quick way to limit this issue is to make sure you use the paint on the version instead of the spray on. With the spray on, it’s really difficult to control where you get the silicone on which will obviously increase the chances of getting the silicone on the wrong components of the drone. If you’ve ever used spray paint to paint, you’ll know what I’m talking about.
Before starting.
- Take out any electronic components that you want to waterproof. Remember the most important and most sensitive components that you probably want to be waterproofing are the printed circuit boards.
- If you want to paint around ports and plugs, make sure they are plugged in first to avoid covering them by mistake.
- Make sure you don’t get any silicone on ports where you would have to plug something in. Remember that silicone will blog these ports because it resists current.
- You’ll need to grab a bottle of Silicone Conformal Coating from Amazon here.
- You’ll be able to solder straight through this if need be, so don’t let that worry you.
- Don’t use this on any internal components of your camera.
- This will more than likely void your warranty.
Lets get started.
- The first step, take out your drones battery and any other media cards.
- Begin by taking off your drones and opening it to a point that leaves as many printed circuit boards exposed as possible.
- Start brushing the silicone over printed circuit boards. Cover as much surface area as possible. The silicone should have a slight shine to it so you’ll have a visual reference of parts that you have missed.
- You could move on to any chips and electronic motor connections where the wires that come out of the motors meet with the printed circuit board, however, they aren’t nearly as sensitive. And I would recommend using Shake ‘n Bake or CorrosionX instead.
- The only electronics you can’t cover with silicone are the ports. Skip these.
INSIDER TIP: If you haven’t done so already, use Shake ‘n Bake or CorrosionX HD on all ports. This will give it at least some kind of protection against water.
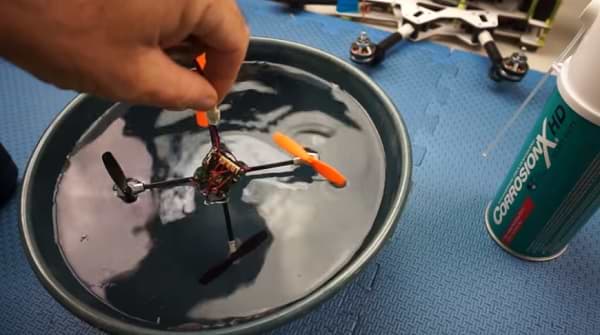
03. Waterproof Drone With CorrosionX HD
This stuff is in a spray bottle that will get everywhere, so it will get messy. However, unlike Conformal Coating, it won’t block electric current, which means that you can get it into ports and any plugs without any problems.
And on top of that, because it can be sprayed out you don’t need to break down your drone as far as if you were going to use Conformal Coating. So why not just use this stuff in the first place? Well, the only downside is it’s not nearly as effective.
Before starting.
- You’ll need to grab a bottle from Amazon.
- You will need to at-least take off your drones outer case.
- This process will get messy!
- You can also solder through this stuff without any issues.
- This might void your warranty. Make sure you double-check with customer support if this is something that worries you.
Let’s get started.
- Start by taking out your drones battery and any media cards.
- Take off your drones outer case, exposing as many of the internal electronics as possible.
- Lay the parts that you’ll be spraying over a large paper towel, or do it outside where you don’t mind getting things dirty.
- Shake the can.
- Point the straw to the components you want to spray.
- First, go for the printed circuit boards, tap the spray quickly, and adjust. A lot will come out so get used to the spray before going crazy.
- Once you’ve covered all printed circuit boards, begin spraying it on any electronic motor connections. They are usually where the wires that come out of the motors meet with a printed circuit board.
- Once that’s done, you begin spraying it on any ports. Remember that this won’t stop any electric current, so you don’t have to worry about things not connecting.
- Make sure every nook and cranny is covered.
INSIDER TIP: Use conformal coating on as many internal components first to give them a strong level of protection, then use CorrosionX on ports, any hard to reach areas and areas you might have missed.
Now for the ultimate test. The video below shows a drone that was fully submerged after being covered with CorrosionX HD.
04. Use A Wetsuit to Waterproof your drone
This method is extremely user friendly because you won’t need to take apart your drone. However, keep in mind that it might be a lot more expensive. Wetsuits for the DJI Phantom 4 will cost you around $69, but if you don’t want to open your drone at all then it might be your only option.
Some drawbacks. Like many other methods, this one also comes with its drawbacks. Because of the added weight on the drone from the wetsuit, you will notice a decrease in flight time and distance. In this forum, a phantom 4 owner mentioned that this wetsuit cut his flight time by around 2 to 3 minutes, which isn’t bad considering the drone can usually fly for around 28 minutes.
Another drawback is these wet suits are not nearly as effective as some of the coating methods above. They are designed to keep the water from seeping through the cracks of the body, which does protect some of the most important electronic components, however, they do very little for the motors of the drone. Which, lucky for us aren’t as sensitive to water.
That being said they definitely do the job and if you have very limited electronic knowledge this might be the best option. However, If your drone does get caught out in the rain with a wetsuit on, I would still recommend that you go through these steps that explain how you can dry your drone.
Here’s where you can get them.
Finding these wetsuits have been pretty tricky, but I found a few for some of the more popular drones. Just a point of note, I’m not really sure who makes these things. They aren’t on any of the drone manufacturers’ websites so I doubt they manufactured them. That being said, make sure you do the research soo that you don’t get something that damages your drone. Here they are: